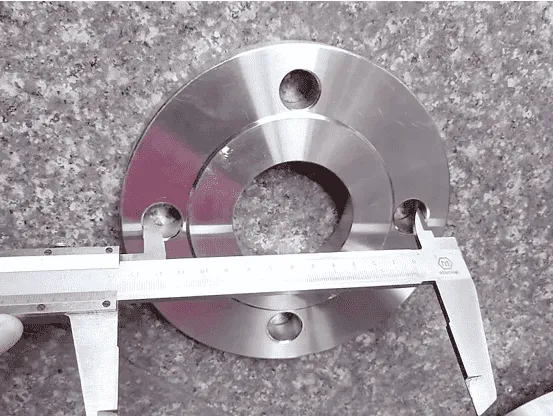
In pipeline engineering, pressure vessel, petrochemical, and steel structure projects, accurate measurement of flanges sizes directly affects sealing performance, installation compatibility, and project safety. Whether for on-site re-measurement, quality inspection, or technical confirmation in international trade, mastering standard and regulated flange measurement methods is crucial.
Before formal measurement, the main dimensional parameters involved in the flange should be clearly defined:
|
Size Name |
Abbreviation |
Description |
|
Inner Diameter |
ID |
Matches the pipe's inner diameter, affecting fluid flow rate |
|
Outer Diameter |
OD |
Maximum outer profile dimension of the flange |
|
Bolt Hole Center Circle Diameter |
PCD / BCD |
Diameter of the circle formed by the bolt hole centers |
|
Bolt Hole Diameter |
Bolt Hole Dia. |
Individual bolt hole size |
|
Flange Thickness |
T |
Determines strength and pressure bearing capacity |
|
Sealing Surface Type |
RF / FF / RTJ |
Affects measurement reference and assembly method |
Note: Inner diameter ≠ Nominal diameter (DN / NPS). Measured values should be verified against standards (ASME, EN, DIN, etc.).
The diameter measurement method is a simple and reliable method for measuring the inner and outer diameters of a flange. The diameter can be calculated using tools. The specific steps are as follows:
Selecting an appropriate tool:
Choose a suitable tool for measuring the flange diameter. Calipers or a diameter measuring instrument are recommended.
Placing the tool on the flange:
Place the tool on the flange, covering two points on the inner and outer diameter circles of the flange. Ensure the tool is perpendicular to the flange plane.
Reading and calculating the diameter:
Read and calculate the diameter. Remember to repeat the measurement several times and take the average as the final result.
Applicable scenarios:
Standard slip-on flanges, butt-welding flanges;
Medium and large flanges (DN50 and above);
On-site and quality inspection.
The arc measurement method can be used to measure curved flanges, suitable for some smaller flanges. The specific steps are as follows:
Cut a suitable length of tap with a wire:
The tap should be smaller than the inner diameter of the flange, and the length of the tap should be greater than the arc length.
Cover the arc with the tap:
Place the tap against the inner arc of the flange, ensuring it is in close contact with the arc surface.
Unroll and measure the tap:
Unroll the tap and measure its length to obtain the arc length. Calculate the arc radius using the formula, and then obtain the inner and outer diameters of the flange.
Applicable scenarios:
Small diameter flanges; Irregular or confined spaces; When the diameter cannot be directly measured.

The three-point method is a commonly used method for measuring flange hole position. It involves taking measurements at three points on the edge of the flange hole. The following are the specific operating steps:
First, place the mark at the center of the flange hole;
Second, randomly select three points, one on the right, one below, and one on the left of the flange hole, and measure their distances to the center of the flange hole using a measuring instrument;
Through the average of the three distances, calculate the distance from the center of the flange hole to the edge of the flange hole;
Subtract the measured distances to obtain the difference between the two ends of the flange hole, and determine whether the difference meets the specified range according to the standard.
The three-point method is simple and easy to implement, and applicable to flanges and holes of various specifications. However, since only three points of the flange hole are measured, a comprehensive and accurate measurement cannot be guaranteed, so the cross-measurement method is required.
Applicable scenarios: Initial on-site inspection; Non-high-pressure systems; Small and medium-sized flanges.
The cross-measurement method is more accurate than the three-point method. It determines the flange hole position by cross-measuring at different positions on the edge of the flange hole. Here are the specific operating steps:
Place the mark at the center of the flange hole;
Randomly select four points at opposite positions on the flange hole, and use a measuring instrument to measure the distance from each point to the center of the flange hole;
Add the four measured distances pairwise to calculate the four diagonals, and determine if the diagonal lengths are the same.
By using the cross-splitting method, the accuracy of the flange hole position can be determined more intuitively, thus ensuring the connection quality between the flange and the pipeline.
Applicable scenarios: ASME / EN / DIN flanges; export projects; high pressure and high temperature conditions.
|
Common Issues |
Recommendations |
|
Measurement Not Perpendicular |
Use a horizontal platform or positioning fixture |
|
Single Reading |
Average of at least three readings |
|
Influence of Surface Burrs |
Clean chamfers before measurement |
|
Ignore Standard Comparison |
Must be checked against ASME / EN / DIN |
Measurement data should be compared with corresponding standards, such as: ASME B16.5 / B16.47, EN 1092-1, DIN 2501, and GB/T 9112~9124.
For export orders, it is recommended to include measurement records and tolerance specifications to increase customer trust.
During actual measurements, attention should be paid to some details, such as the perpendicularity of the tool to the flange surface, the accuracy of readings, avoiding scratches on the flange surface during measurement, and calculating the average of multiple measurements.